Introduction to Azure ML
Created:
Updated:
Topic: Azure ML: from beginner to pro
Introduction
If you’re used to training machine learning models on your local hardware, you may have experienced frustration as you hit the limits of what it can do. Maybe you’ve trained a model overnight or over several days for a school project, preventing you from using your laptop for other homework. Or maybe you’ve deployed a model in your company’s hardware, only to find out that your product went viral unexpectedly and your hardware couldn’t scale to meet demand. Or maybe as your team grows, you need a better way to manage the workflow of your machine learning project. These are a few common scenarios that are easily solved by moving your training and deployment to the cloud.
This article is the first in a series that will cover Azure ML, Microsoft’s AI cloud solution, in detail.
In this post, I will provide you with an overview of the major Azure ML concepts you need to understand to become effective at using this platform. Learning the concepts will make it easier for you to follow the code samples in my upcoming posts, and will provide a good foundation for writing your own code.
Let’s get started.
Major concepts in Azure ML
In essence, Azure ML allows you to train and deploy your machine learning models in the cloud. This sounds pretty simple, but when you start analyzing all the different scenarios that ML practitioners need, there’s actually more than meets the eye. Our goal for Azure ML is to provide our users with a platform that has the right balance of simplicity and flexibility.
When working with Azure ML, you’ll create several cloud resources that will help you implement your scenario. The diagram below shows the main resources that make up Azure ML:
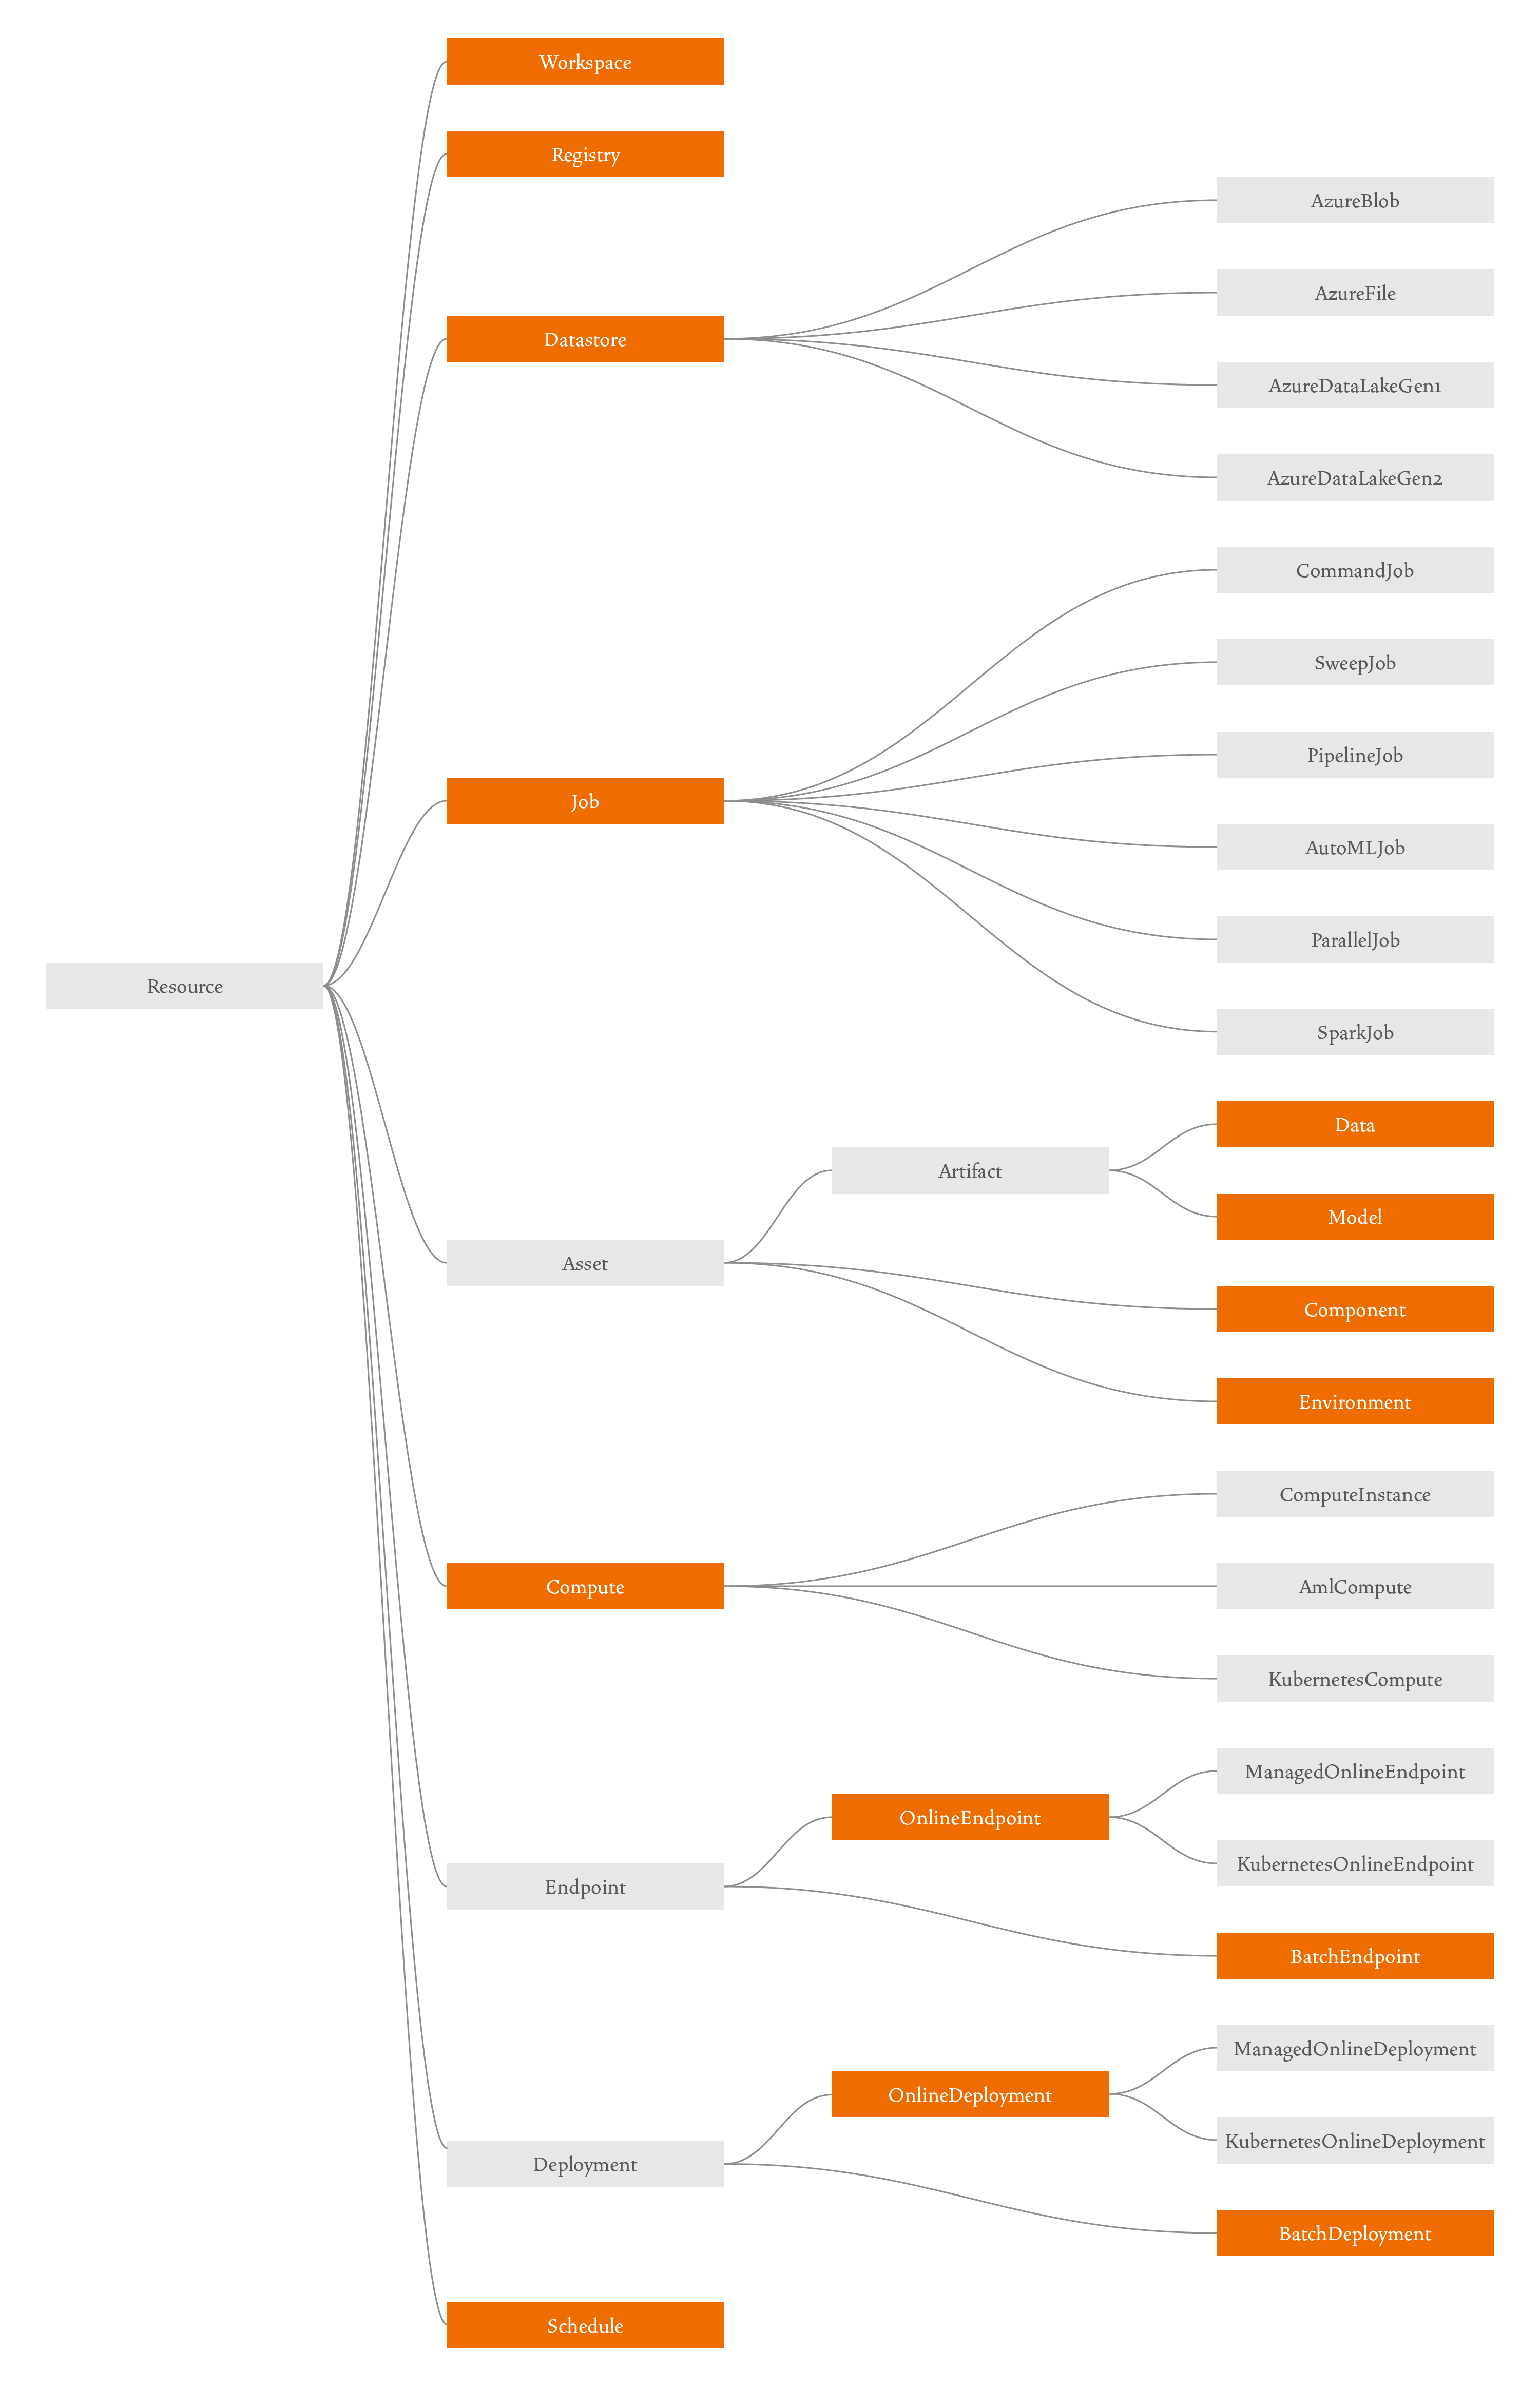
Here’s a high-level overview of these resources:
(I’ll explain why some of these are highlighted in orange later.)
Workspace
A workspace is a central resource used to register all other resources, and to track the history of your training job executions. You can learn more about it in the documentation.
Registry
A registry allows users to share Azure ML assets across all users within an organization. You can learn more about it in my blog post or in the documentation.
Datastore
A datastore is a reference to an existing storage account on Azure. You can learn more about it in the documentation.
Job
A job is a resource that specifies all the details needed to execute your training code in the cloud: inputs and outputs, the type of hardware to use, software to install, and how to run your code. You can learn more about training models in the documentation. There are currently six types of jobs:
-
Command Job - Contains information to execute a single command. You can learn more about this in my blog post.
-
Pipeline Job - Enables you to break up your machine learning task into several steps, and to specify their inter-dependencies. Check out my blog post on the topic to learn more.
-
Sweep Job - Helps you do hyperparameter tuning. Learn more about this topic in my blog post.
-
AutoML Job - Automates the process of comparing the performance of different models with different parameters, for your particular scenario.
-
Parallel Job - Allows you to split a serial task into mini-batches and dispatch those mini-batches to multiple computes to execute in parallel.
-
Spark Job - Enables you to run large data wrangling operations efficiently, within Azure ML, by leveraging Azure Synapse Analytics to get access to an Apache Spark pool.
Asset
Assets are versioned resources, and Azure ML supports four different types of assets: Data, Model, Environment, and Component. Data and Model are artifacts, which is a special type of asset that in addition to a version, also has a path associated with it.
-
Data - A reference to a data source location. This is the data that will be used to train your model.
-
Model - A reference to the location of a trained model.
-
Environment - The software runtime and libraries that you want installed on the hardware where you’ll be training or deploying your model. You can learn more about it in my blog post about environments.
-
Component - A reusable piece of code with inputs and outputs, similar to a function. Components are typically used as steps in a pipeline job, so I talk about them in my blog post on pipelines.
Compute
You can learn everything about compute in my blog post on this topic. Azure ML supports three major types of compute:
-
Compute Instance - A virtual machine set up for running ML code during development.
-
Compute Cluster (AmlCompute) - A set of virtual machines that can scale up automatically based on traffic.
-
Attached Computes - Any compute target that you manage yourself outside of Azure. The most commonly used one is Azure Arc-enabled Kubernetes, which you can read about in the documentation.
Endpoint
An endpoint is a web-based API for feeding data to your model and getting back inference results. In Azure ML, an endpoint can have any number of deployments, which specify the resources that do the actual inferencing. You can learn more about endpoints and deployments in the documentation.
-
Managed Online Endpoint - Endpoint designed to quickly process smaller requests and provide near-immediate responses. I cover these in two blog posts, one focusing on MLflow models, and another focusing on non-MLflow models.
-
Batch Endpoint - Endpoint designed to handle large requests, working asynchronously and generating results that are held in blob storage. I also cover these in two blog posts, one focusing on MLflow models, and another focusing on non-MLflow models.
-
Managed Online Deployment and Batch Deployment - When using these deployments, Azure manages compute resources, OS updates, scaling, and security.
-
Kubernetes Online Deployment - When using this deployment, you manage your own resources using Kubernetes.
Schedule
A schedule allows you to programmatically schedule a job to run after some elapsed time. You can learn more about this in the documentation.
Different ways of creating resources
Now that you have a good high-level understanding of the resources that make up Azure ML, you might be wondering how you can create these resources. Azure ML supports four different methods for resource management:
-
Azure ML Studio
The Azure ML Studio is a web portal that allows you to create, maintain, and visualize your Azure ML resources. Here’s a screenshot of what my portal looks like at the moment:

You can see that the menu on the left aligns roughly with the Azure ML resources in the earlier diagram. The menu item I have selected, “Jobs,” shows all the training jobs I completed recently. I can click on each of them to see more details. As you learn more about these resources in upcoming blog posts, the UI in the Studio will start to make sense to you. You can learn more about the Azure ML Studio in the documentation.
-
Azure ML CLI
The Azure ML CLI is an extension to the Azure CLI, providing commands that allow you to manipulate resources by specifying their details in YAML files. Azure ML CLI commands follow the pattern “
az ml <noun> <verb> <options>”. For example:az ml model create --file model.ymlHow do you know which nouns you can use? The nouns are marked in orange in my diagram earlier in this post. You can also run
az ml --help. To know which verbs are allowed for each noun, you can runaz ml <noun> --help. You can also find all commands and associated verbs in the documentation.You can install the Azure ML CLI by following these instructions. A full reference for these commands can be found in the documentation.
-
Azure ML SDK
The Azure ML SDK is a Python package that allows you to create and maintain Azure ML resources using code. You can install it by following these instructions, and you can find a full reference for this package in the documentation.
-
REST
Azure ML also provides a REST API that allows you to manipulate resources. You can learn more about it in the documentation.
Which of these four Azure ML resource management methods should you choose? Well, it depends.
The Azure ML Studio guides you through many of the less intuitive choices you need to make, so it’s great for beginners. It also shows all the resources you’ve created together with all their relevant details in a single location, and it offers great visualizations for your logs. However, it doesn’t provide you with an efficient way to repeat your steps. As an advanced user, I use it when I need to double check certain choices while using other more repeatable methods for resource creation, when I need to visualize my resources and logs, and when I need to create and maintain resources and I know that I won’t need to repeat those steps in the future.
I use the Azure ML CLI method for a lot of my day-to-day work, for the following reasons:
- It’s easily repeatable. For example, if my resource creation isn’t quite right the first time, I can easily update it by making minor tweaks in the YAML file and re-running the CLI command.
- It’s language independent (unlike the SDK, which I’ll cover next). You might think that this is not an advantage for you, because everyone on your team is using Python anyway. But maybe you’ll hire a great data scientist that’s more comfortable with R. Or maybe Julia overtakes Python in popularity someday, and your team ports all existing code to Julia. Using the CLI might pay off in the future.
- It’s the easiest method to separate your machine learning logic from your cloud-specific logic. What I mean by this is that it should be absolutely clear to anyone looking at your project which files are needed to solve your machine learning task, and which files are needed to bring training and deployment to the cloud. If your team decides to switch to a different cloud provider in the future, it should be easy to replace a set of cloud-related files with another, without touching the actual machine learning code. When using the CLI, all Azure ML configuration files are written in YAML, and your ML code is written in Python or R, so this distinction is clear without any extra work on your part.
The Azure ML Python SDK is also great, because it also provides us with a repeatable way to manipulate resources. Most data scientists and ML engineers are familiar with Python these days, and are pretty comfortable adding a new package to their workflow. Also, some scenarios may actually be easier to accomplish using the SDK, rather than the CLI. For example, if you need to create a large number of components in a pipeline and they’re all similar to each other, it’s much easier to use a for loop in code than to copy and paste the same YAML multiple times. The one pitfall of using the SDK is that it doesn’t enforce a separation between your machine learning and your Azure ML code, and as a result users often mix the two. For this reason, I tend to recommend the CLI method for people that are starting out — this separation comes for free, so you don’t have to think about it. But with a little bit of intentional project planning, it’s not that hard to keep your machine learning code separate from your cloud code. I discuss how I organize my SDK code in this blog post.
The REST API is mostly used by ISVs (Independent Software Vendors) that are building solutions on top of Azure ML. I rarely use our REST API.
You can choose a single resource creation method for your project, or you can mix them all in a single project, as I explain in this blog post. If you’re a data scientist or ML engineer, I think that you should be familiar with the first three methods, so that you can choose whichever one is most appropriate for each scenario.
Notebooks vs Python files
Azure ML works with both notebooks and Python files, and you’ll find many sample apps using both methods.
Notebooks are great for the initial phase when you’re experimenting with different techniques. Data scientists have embraced their use, and often use Azure ML within notebooks to train their experimental models with GPUs in the cloud.
Python files, on the other hand, are great to keep your ML and Azure ML code separate, and to ensure that your code is nicely refactored and organized. They’re also more convenient when creating certain Azure ML resources, such as Components, which must be defined in separate Python files (you could use the %writefile command within a notebook, but as the complexity of your project grows, this approach quickly becomes unmaintainable). When talking to customers, I often see that their data scientist starts by experimenting using notebooks, and when the code is ready for production, their ML engineer refactors it nicely into Python files and adds production-ready Azure ML resources to it.
But of course, I also see many exceptions to this approach. Some companies have a single person performing the tasks of a data scientist and ML engineer. In that case, whether they use notebooks or Python files often depends on whether they have a background in statistics/math/science or software engineering. Other companies use a hybrid approach, where they write part of their code in Python files, and part using notebooks. With time, you’ll find the approach that works best for you, and whatever that is, Azure ML will support it. For this blog series, I’ve decided to follow the production-level workflow of a typical ML engineer, with Python files. But if you prefer to use notebooks for your project, all the concepts you’ll learn here will still apply, and you can easily convert my code into notebook form.
MLflow
MLflow is an open source platform for the machine learning lifecycle. Many companies and individuals contribute to this open source project, including Microsoft. Azure ML has fully embraced MLflow, and my recommendation is for you to take advantage of its capabilities if you can. I’ll show examples that work with and without MLflow in the blog posts coming up in this series, and you’ll see first-hand the many advantages of using it. For now, I’ll give you a quick overview of its functionality.
-
MLflow tracking
I love MLflow’s ability to track different types of data (numbers, strings, dictionaries, plots, images, files, and more), and its support for visualizing that data. For example, whenever I log a numeric metric like accuracy or loss while training, MLflow will show me a graph without the need for any additional plotting code. I can use the MLflow UI to visualize the graph, when training locally. Or I can use the Azure ML Studio, when training locally with a tracking URI, and when training in the cloud.
-
MLflow model deployment
MLflow defines a standard format for packaging machine learning models, regardless of which technology was used to create them. This enables services to consume different types of models by simply supporting the interface defined by MLflow. As you can imagine, this is a very attractive feature because it facilitates the sharing of models across different technologies. MLflow’s standard format has gained wide adoption in the industry, so it’s no surprise that Azure ML supports it too.
One advantage of saving a model using MLflow when working with Azure ML becomes apparent when you deploy the model. Deploying a non-MLflow model requires you to write a “scoring” code file, but deploying an MLflow model can be accomplished without writing any additional code. You can read more about this scenario in the documentation, or by reading my blog post on deploying wih MLflow, and my blog post on deploying without MLflow.
-
MLflow model registry
Azure ML provides you with great support for managing your models. But if you prefer to manage your models using the MLflow API, Azure ML supports that too. Any commands you execute using the MLflow API, when executed in the cloud or locally with a tracking URI, will be reflected in Azure ML. You can read more about this in the documentation, or you can look at this code sample for more details.
-
MLflow projects
MLflow also defines a standard format for packaging your data science code. You can use the MLflow project API to run and track your code locally, run your code locally and track it in the cloud, or run your code and track it in the cloud. You can read more about this scenario in the documentation.
Conclusion
I hope this article gave you a good high-level overview of Azure ML’s major concepts. In future posts, I’ll dive into the details of how you can use these concepts to train and deploy machine learning models on Azure ML.
Read next: How to train and deploy in Azure ML