How to train and deploy in Azure ML
Created:
Updated:
Topic: Azure ML: from beginner to pro
Introduction
My goal for this post is to show you the simplest way to train your model and deploy it in the cloud, using Azure ML. Why would you want to train and deploy in the cloud? Training in the cloud will allow you to handle larger ML models and datasets than you could train on your development machine. And deploying your model in the cloud will allow your system to scale to many more inference requests than a development machine could handle.
I recommend that you read my introduction to Azure ML before reading this post, so that you have a good high-level understanding of Azure ML. But you’ll still be able to follow along if you don’t.
Any task you want to accomplish using Azure ML can be done in three ways: using the Azure ML CLI, the Python SDK, or the Studio UI. This post will cover all three, which I hope will enable you to choose the best approach for each scenario you encounter in the future.
I’ve created two GitHub repositories to accompany this post. The first GitHub repo shows how to train and deploy using the Azure ML CLI, and the second GitHub repo shows how to use the Python SDK.
For Azure and project setup, please refer to the README files of each GitHub repo. You’ll also find there a reference list of all the commands explained in this post.
Training and inference on your development machine
Before moving your model to the cloud, it’s always a good idea to train and test it on your development machine (which could be your local machine, a GitHub codespace, or an Azure ML compute instance). We’ll be training a PyTorch model using the FashionMNIST dataset in this project — you can find the code in the src directory of both repos associated with this post. To run it locally, you can simply select the “Train locally” run configuration in VS Code, and press F5.
The training code uses the MLflow framework to log metrics and to save the model. Using MLflow to log metrics enables us to visualize them without writing any graphing code, by simply running the MLflow UI command:
mlflow ui
When I run this command, I get a link that I can click on to see the graphs.
Using MLflow to save the trained model helps us to make a prediction locally, which you can do by executing either of the following commands from the root of the repo:
cd aml_command_cli
mlflow models predict --model-uri "model" --input-path "test_data/images.csv" --content-type csv
mlflow models predict --model-uri "model" --input-path "test_data/images.json" --content-type json
MLflow supports test data in CSV and JSON forms, and I include both types of test data in the project, to give you options. The output of the command that uses the JSON data looks like this:
[
  {"0": -3.6867828369140625, "1": -5.797521591186523, "2": -3.2098610401153564, "3": -2.2174417972564697, "4": -2.5920114517211914, "5": 3.298574686050415, "6": -0.4601913094520569, "7": 4.433833599090576, "8": 1.1174960136413574, "9": 5.766951560974121},
  {"0": 3.5685975551605225, "1": -7.8351311683654785, "2": 12.533431053161621, "3": 1.6915751695632935, "4": 6.009798049926758, "5": -6.79791784286499, "6": 7.569240570068359, "7": -6.589715480804443, "8": -2.000182628631592, "9": -8.283203125}
]
The keys in this prediction dictionary correspond to clothing items in the Fashion MNIST dataset, and the values represent how likely each clothing item is in our prediction. For this particular example, keys 9 and 2 have the highest values, which correspond to “Ankle boot” and “Pullover.”
Keep in mind that your model does not need to use MLflow to work with Azure ML! As long as you’re happy with your tests on your development machine (with full or partial data), you’re ready to move your training and deployment to the cloud.
Training and deploying using the Azure ML CLI
You’ll need to create a few Azure ML resources in order to train and deploy a model using Azure ML. In this section, I’ll show you how to create those resources using the Azure ML CLI. Check out my introductory article for an overview of the major resources supported by Azure ML. Here are the resources we’ll use for this simple scenario:
- Compute — We’ll create a cluster of CPU machines to run training in the cloud.
- Data — We’ll copy our Fashion MNIST data to the cloud so that it’s easily accessible to our training job.
- Job — We’ll create a CommandJob (the simplest type of Job supported by Azure ML) to train the model.
- Model — Once the training job produces a model, we’ll register it with Azure ML so that we can deploy it as an endpoint.
- Managed Online Endpoint — We’ll use this particular type of endpoint to make predictions because it’s designed to process smaller requests and give near-immediate responses.
- Managed Online Deployment — Our endpoint can accommodate one or more deployments; we’ll just use one.
You can find the compute YAML configuration in the cluster-cpu.yml file. We start by defining the details of the compute we want. As you can see below, we name our resource “cluster-cpu” and specify that we want between 0 and 4 machines. We also specify that we want a machine of size Standard_DS4_v2. How do you know which machine size to choose? You can learn more about that in my blog post about compute.
$schema: https://azuremlschemas.azureedge.net/latest/amlCompute.schema.json
name: cluster-cpu
type: amlcompute
size: Standard_DS4_v2
location: westus2
min_instances: 0
max_instances: 4
Notice that we also specify a schema, which gives us intellisense and warns us of errors when editing this file. If you press “Ctrl + Space” with the cursor on a new line, you’ll see that VS Code tells you all the other properties that can go in this file. And if you type a non-supported property name, VS Code will alert you by underlining the property name with red squiggles.
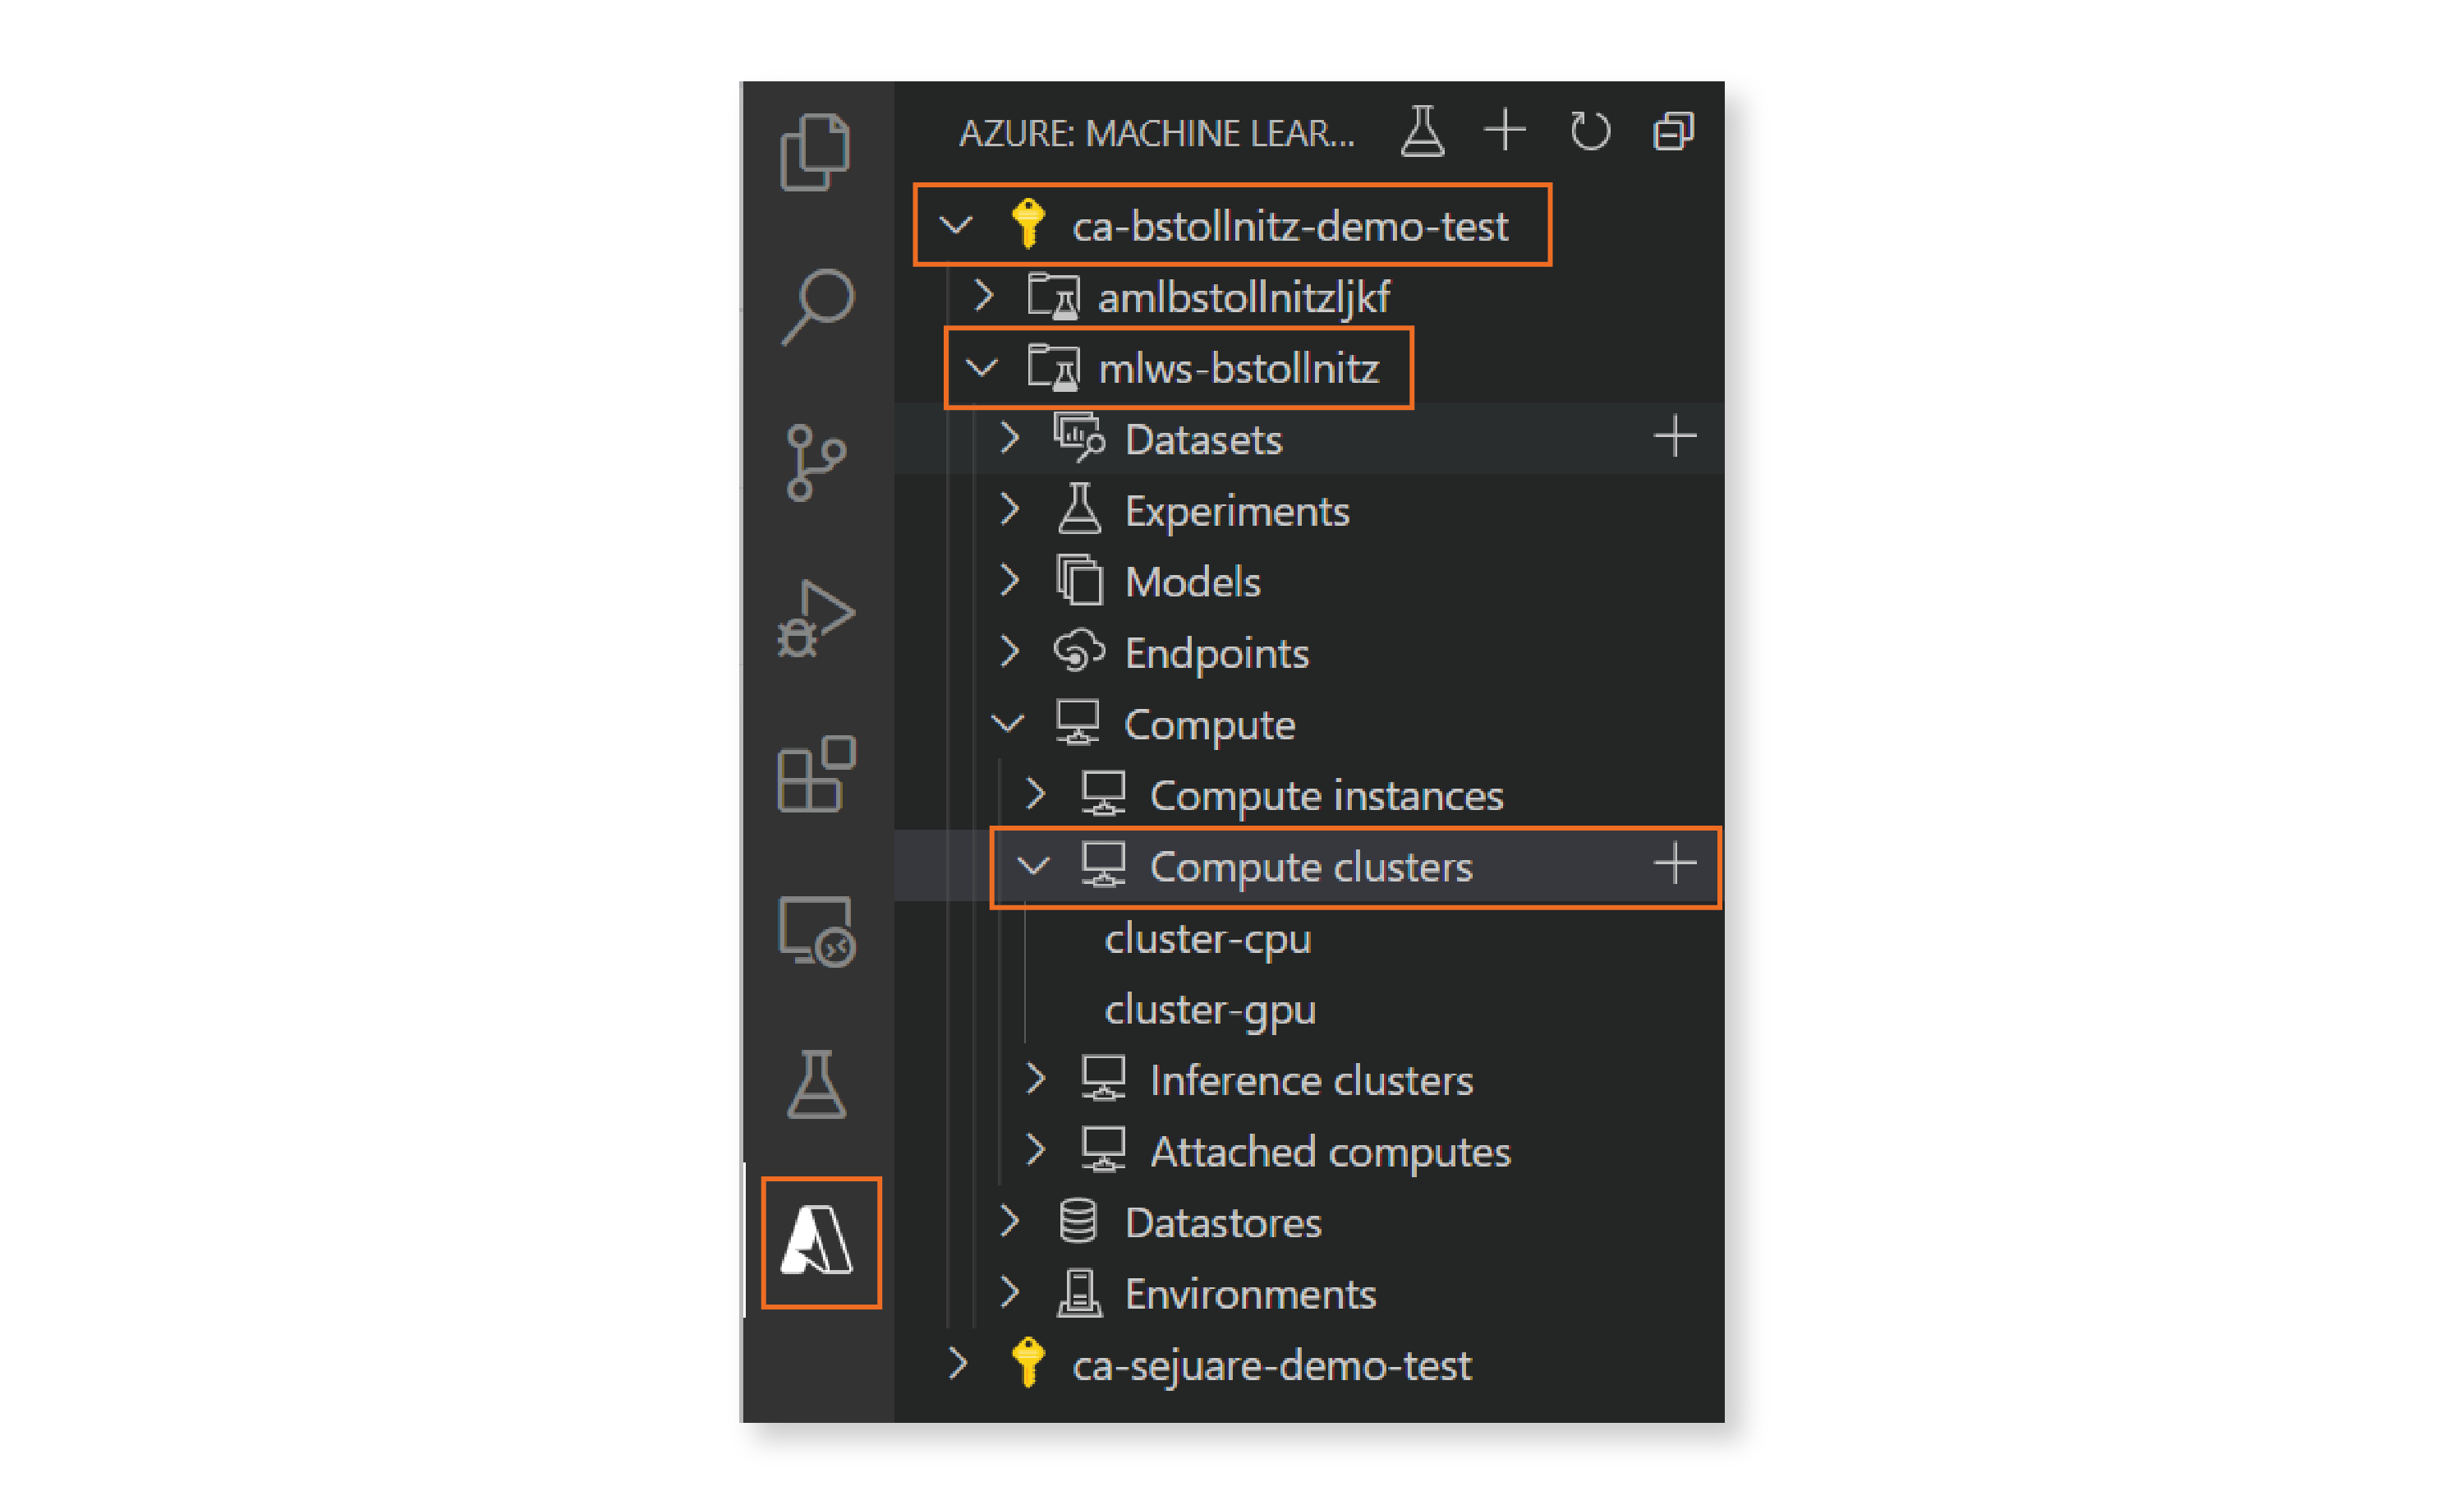
How do you know the schema URI for each resource? You can find URIs for all resources in the documentation or you can use the Azure ML extension for VS Code. If you have this extension installed, you can go to the left menu in Visual Studio, click on the symbol for the extension, select your Azure subscription, and pick your desired ML Workspace. You can then browse your existing cloud resources by navigating the tree. Clicking on the ”+” icon to the right of a resource name generates a new YAML file for that resource type, populated with the appropriate schema and a few commonly used properties.
Now that we have the compute details specified, we need to instruct Azure ML to create the resource in the cloud. This can be done by executing the following command in the terminal:
az ml compute create -f cloud/cluster-cpu.yml
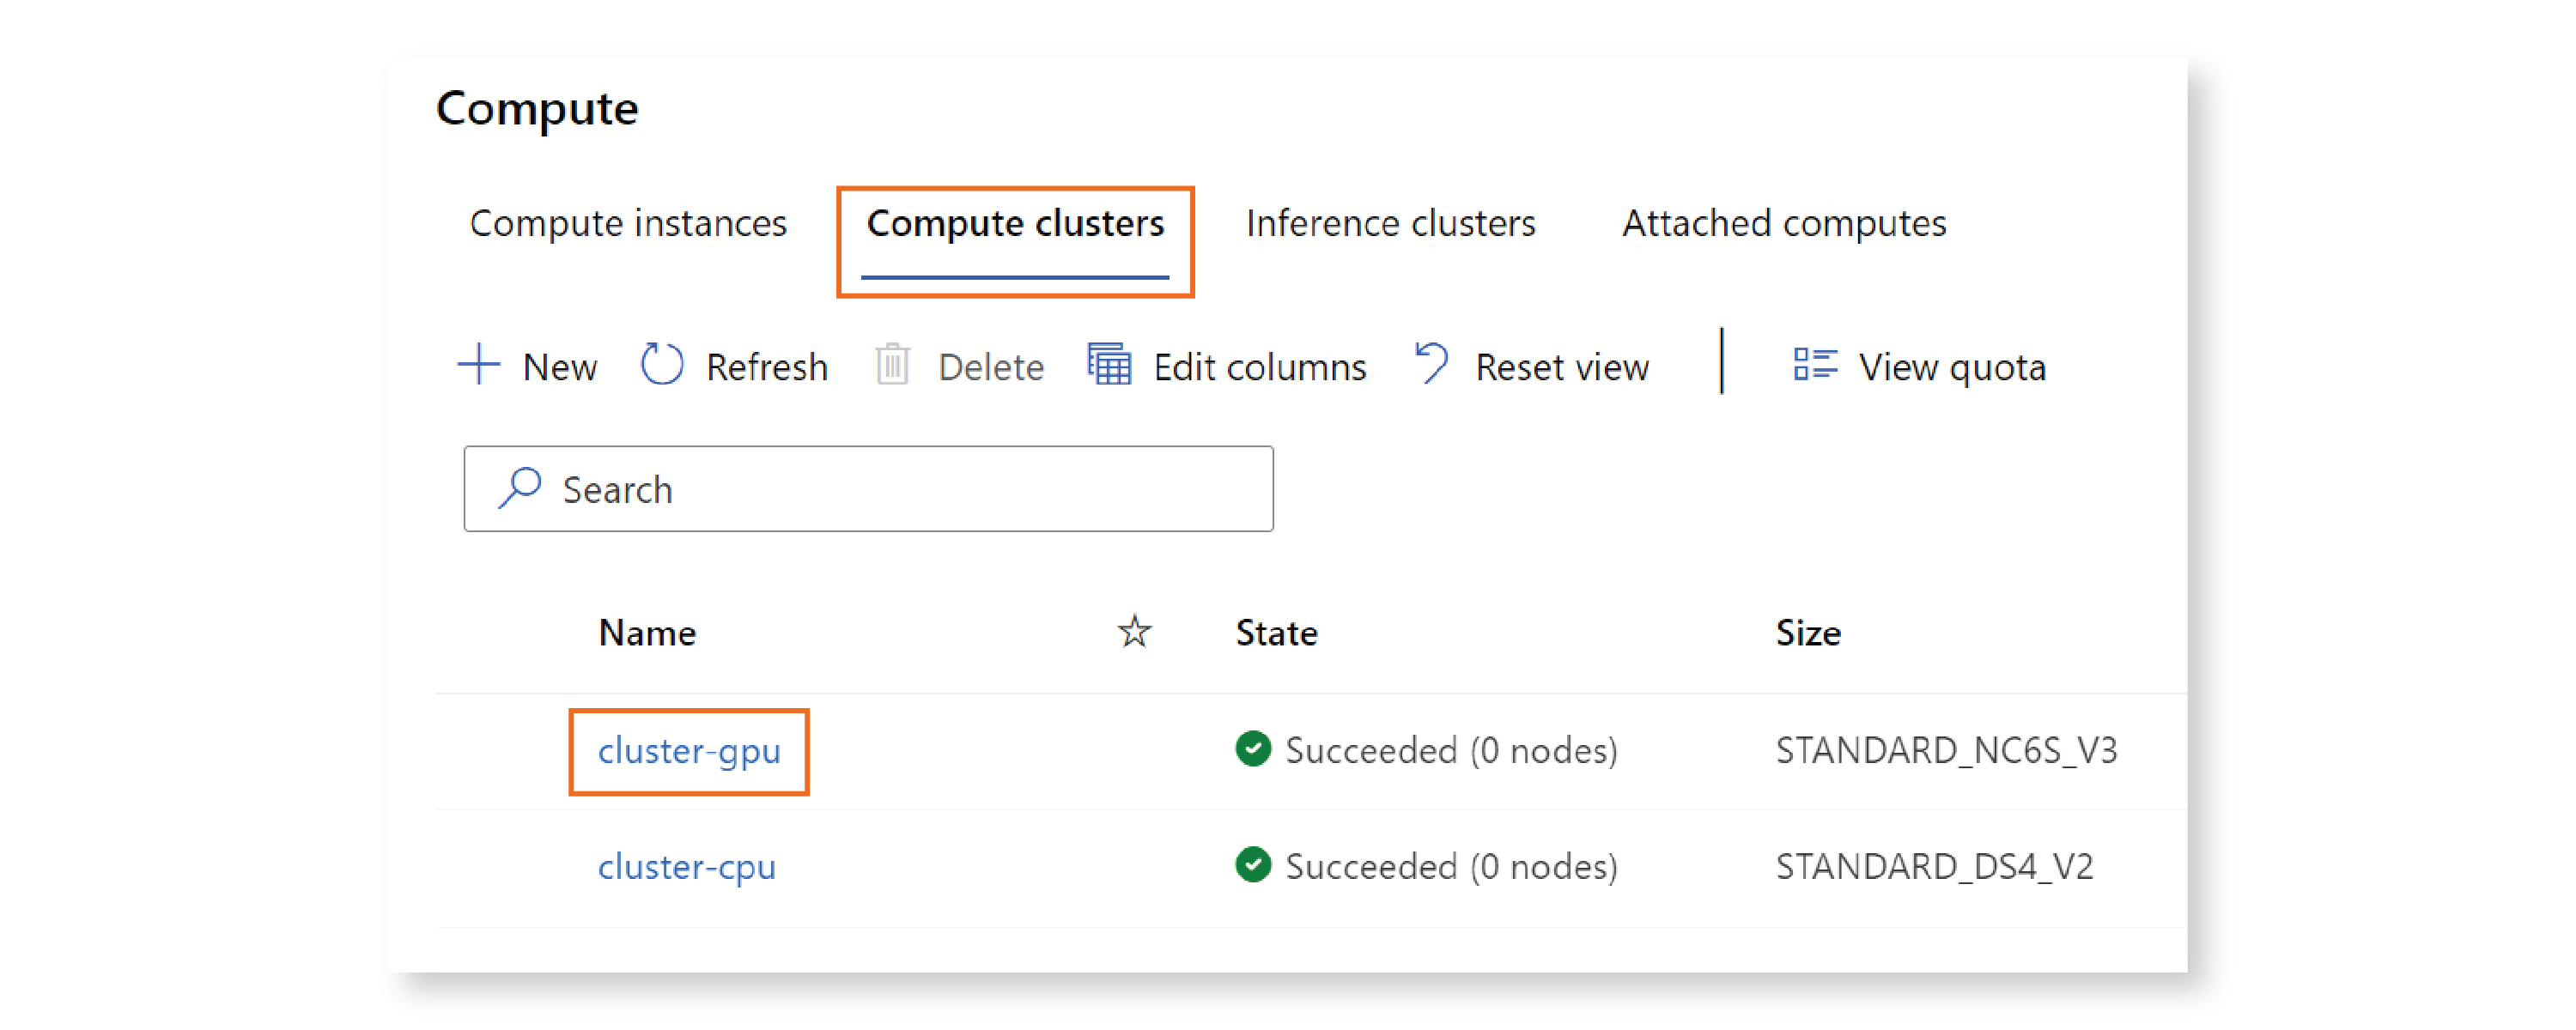
You can verify that your resource was created by visiting the Azure ML Studio. Click on “Compute” in the left menu, then “Compute clusters,” and you should see a cluster named “cluster-cpu” listed on that page.
Congratulations! You created your first Azure ML resource! :)
We can follow similar steps to create the data resource. Our data.yml configuration file specifies that we want to upload the local “data” folder into the cloud, and register it under the name “data-fashion-mnist”:
$schema: https://azuremlschemas.azureedge.net/latest/data.schema.json
name: data-fashion-mnist
description: Fashion MNIST Dataset.
path: ../data/
type: uri_folder
We can execute a similar CLI command in the terminal:
az ml data create -f cloud/data.yml
We can then go to the Azure ML Studio, click on “Data,” and verify that a data resource with name “data-fashion-mnist” was created. If you click on the resource name, and then on “Explore,” you’ll see all the Fashion MNIST data files listed there.
Next we’ll create the job resource. In order to train our model, we need to specify the following information:
- The compute hardware used, which is the compute cluster we defined earlier.
- The software environment we want installed on that hardware. For more information about environments, check out my blog post on the topic.
- Where our training code is located, which in our case is within the “src” directory.
- Inputs to the training code. In our scenario, that’s just the data resource we created earlier.
- Outputs of the training code. In our scenario, we output the trained model.
- A command that executes your training code. You can pass parameters to this command, as you can see below.
You can see that all of this information is specified in the job.yml definition file:
$schema: https://azuremlschemas.azureedge.net/latest/commandJob.schema.json

type: command
description: Trains a simple neural network on the Fashion-MNIST dataset.
experiment_name: "aml_command_cli"
compute: azureml:cluster-cpu

inputs:
  fashion_mnist:
    path: azureml:data-fashion-mnist@latest
outputs:
  model:
    type: mlflow_model

code: ../src
environment:
  image: mcr.microsoft.com/azureml/openmpi4.1.0-ubuntu20.04:latest
  conda_file: conda.yml
command: python train.py --data_dir ${{inputs.fashion_mnist}} --model_dir ${{outputs.model}}
Creating and starting the job in the cloud should look familiar by now:
az ml job create -f cloud/job.yml
This command works, but it’s not quite enough for our scenario. That’s because once the job finishes training the model, we want to register the model, and that requires a reference to the job instance. One way to get this reference is by running the following command (assuming you’re using bash or zsh):
run_id=$(az ml job create -f cloud/job.yml --query name -o tsv)
The --query parameter specifies that we want to query the JSON returned by the command using JMESPath language, as you can see in the documentation for the “az ml job create” command. We specify that we want to extract the value associated with the “name” key from the returned JSON. The -o parameter specifies that we want the output to be formatted using tab-separated values — you can learn more about output formats in the documentation.
In the Azure ML Studio, you can go to “Jobs”, and look for the name “aml_command_cli.” Click on it, and you’ll see all the job instances associated with this job definition. If you execute the CLI command again, it will add another entry to this page.
When training has completed, you can create an Azure ML resource for the trained model. I could have created another YAML file with the model specification, but I want to show you a different way of creating a resource. Since I only have three properties to set in this case, I can provide the values on the command line:
az ml model create --name model-command-cli --path "azureml://jobs/$run_id/outputs/model" --type mlflow_model
We use --type mlflow_model to specify that the model was created using MLflow. Also, notice the syntax that I’m using to refer to the output of the job. I like the fact that I can create the model directly from the job output, without having to download it first to my local machine. But you could download the model to use locally if you wanted to, with the following command:
az ml job download --name $run_id --output-name "model"
You can verify that your model was created correctly by going to the Azure ML Studio, clicking on “Models,” and then looking for the “model-command-cli,” which is the name we specified in the CLI command.
Great! We now have a trained model, and want to create an endpoint that we can use to invoke it. In Azure ML, an endpoint can have several deployments, which specify the compute and model we want to use. This is useful, for example, if you want to direct some percentage of your traffic to one deployment and the rest to another. But we’ll keep it simple here, and use a single deployment that handles all traffic. You can find the YAML definition for the endpoint in the endpoint.yml file:
$schema: https://azuremlschemas.azureedge.net/latest/managedOnlineEndpoint.schema.json
name: endpoint-command-cli
auth_mode: key
And you can find the YAML for the deployment in the deployment.yml file:
$schema: https://azuremlschemas.azureedge.net/latest/managedOnlineDeployment.schema.json
name: blue
endpoint_name: endpoint-command-cli
model: azureml:model-command-cli@latest
instance_type: Standard_DS4_v2
instance_count: 1
And here are the commands we can execute to create these resources:
az ml online-endpoint create -f cloud/endpoint.yml
az ml online-deployment create -f cloud/deployment.yml --all-traffic
As usual, you can go to the Azure ML Studio, click on “Endpoints,” and see your endpoint and deployment creation in progress. The deployment creation in particular may take several minutes.
Once the endpoint and deployment are created, we’re ready to invoke the endpoint, which we can do with the following command:
az ml online-endpoint invoke --name endpoint-command-cli --request-file test_data/images_azureml.json
You may have noticed that this is not the same JSON file I used to test the endpoint locally, using MLflow. The only difference is that this JSON wraps the JSON we used previously with a dictionary with key “input_data” — this is currently a requirement for Azure ML. You can look at the test image generation code to see how I generated the images_azureml.json file. Also, keep in mind that the CSV format is not supported by Azure ML at the moment.
Before we wrap up, you might want to delete the endpoint, to avoid getting charged:
az ml online-endpoint delete --name endpoint-command-cli -y
Training and deploying using the Azure ML Python SDK
All the Azure ML CLI steps that I presented in the previous section can also be accomplished using the Azure ML Python SDK. You can look at this GitHub repo to see how, including instructions on how to run it. Here’s the code to run a job and download the trained model, which you can find in the job.py file:
"""Creates and runs an Azure ML command job."""

import logging
from pathlib import Path

from azure.ai.ml import MLClient, Input, Output, command
from azure.ai.ml.constants import AssetTypes
from azure.identity import DefaultAzureCredential
from azure.ai.ml.entities import (AmlCompute, Data, Environment, Model)

from common import MODEL_NAME

COMPUTE_NAME = "cluster-cpu"
DATA_NAME = "data-fashion-mnist"
DATA_PATH = Path(Path(__file__).parent.parent, "data")
CONDA_PATH = Path(Path(__file__).parent, "conda.yml")
CODE_PATH = Path(Path(__file__).parent.parent, "src")
MODEL_PATH = Path(Path(__file__).parent.parent)


def main() -> None:
    logging.basicConfig(level=logging.INFO)
    credential = DefaultAzureCredential()
    ml_client = MLClient.from_config(credential=credential)

    # Create the compute cluster.
    cluster_cpu = AmlCompute(
        name=COMPUTE_NAME,
        type="amlcompute",
        size="Standard_DS4_v2",
        location="westus2",
        min_instances=0,
        max_instances=4,
    )
    ml_client.begin_create_or_update(cluster_cpu).result()

    # Create the data set.
    dataset = Data(
        name=DATA_NAME,
        description="Fashion MNIST data set",
        path=DATA_PATH.as_posix(),
        type=AssetTypes.URI_FOLDER,
    )
    ml_client.data.create_or_update(dataset)

    # Create the environment.
    environment = Environment(image="mcr.microsoft.com/azureml/" +
                              "openmpi4.1.0-ubuntu20.04:latest",
                              conda_file=CONDA_PATH)

    # Create the job.
    job = command(
        description="Trains a simple neural network on the Fashion-MNIST " +
        "dataset.",
        experiment_name="aml_command_sdk",
        compute=COMPUTE_NAME,
        inputs=dict(fashion_mnist=Input(path=f"{DATA_NAME}@latest")),
        outputs=dict(model=Output(type=AssetTypes.MLFLOW_MODEL)),
        code=CODE_PATH,
        environment=environment,
        command="python train.py --data_dir ${{inputs.fashion_mnist}} " +
        "--model_dir ${{outputs.model}}",
    )
    job = ml_client.jobs.create_or_update(job)
    ml_client.jobs.stream(job.name)

    # Create the model.
    model_path = f"azureml://jobs/{job.name}/outputs/model"
    model = Model(name=MODEL_NAME,
                  path=model_path,
                  type=AssetTypes.MLFLOW_MODEL)
    registered_model = ml_client.models.create_or_update(model)

    # Download the model (this is optional).
    ml_client.models.download(name=MODEL_NAME,
                              download_path=MODEL_PATH,
                              version=registered_model.version)


if __name__ == "__main__":
    main()
And here’s the code to create the endpoint, which you can find in the endpoint.py file:
"""Creates and invokes a managed online endpoint."""

import logging
from pathlib import Path

from azure.ai.ml import MLClient
from azure.ai.ml.entities import ManagedOnlineDeployment, ManagedOnlineEndpoint
from azure.identity import DefaultAzureCredential

from common import MODEL_NAME, ENDPOINT_NAME

DEPLOYMENT_NAME = "blue"
TEST_DATA_PATH = Path(
    Path(__file__).parent.parent, "test_data", "images_azureml.json")


def main() -> None:
    logging.basicConfig(level=logging.INFO)
    credential = DefaultAzureCredential()
    ml_client = MLClient.from_config(credential=credential)

    # Create the managed online endpoint.
    endpoint = ManagedOnlineEndpoint(
        name=ENDPOINT_NAME,
        auth_mode="key",
    )
    registered_endpoint = ml_client.online_endpoints.begin_create_or_update(
        endpoint).result()

    # Get the latest version of the registered model.
    registered_model = ml_client.models.get(name=MODEL_NAME, label="latest")

    # Create the managed online deployment.
    deployment = ManagedOnlineDeployment(name=DEPLOYMENT_NAME,
                                         endpoint_name=ENDPOINT_NAME,
                                         model=registered_model,
                                         instance_type="Standard_DS4_v2",
                                         instance_count=1)
    ml_client.online_deployments.begin_create_or_update(deployment).result()

    # Set deployment traffic to 100%.
    registered_endpoint.traffic = {"blue": 100}
    ml_client.online_endpoints.begin_create_or_update(
        registered_endpoint).result()

    # Invoke the endpoint.
    result = ml_client.online_endpoints.invoke(endpoint_name=ENDPOINT_NAME,
                                               request_file=TEST_DATA_PATH)
    logging.info(result)


if __name__ == "__main__":
    main()
And finally, here’s the code to delete the endpoint, which you can find in the file delete_endpoint.py:
"""Deletes an endpoint."""

import logging

from azure.ai.ml import MLClient
from azure.identity import DefaultAzureCredential

from common import ENDPOINT_NAME


def main() -> None:
    logging.basicConfig(level=logging.INFO)
    credential = DefaultAzureCredential()
    ml_client = MLClient.from_config(credential=credential)

    ml_client.online_endpoints.begin_delete(ENDPOINT_NAME)


if __name__ == "__main__":
    main()
Notice how similar the SDK syntax is to the YAML syntax. For example, let’s compare the YAML and Python code used to create the compute cluster. Here’s the YAML:
$schema: https://azuremlschemas.azureedge.net/latest/amlCompute.schema.json
name: cluster-cpu
type: amlcompute
size: Standard_DS4_v2
location: westus2
min_instances: 0
max_instances: 4
And here’s the Python:
...
    cluster_cpu = AmlCompute(
        name="cluster-cpu",
        type="amlcompute",
        size="Standard_DS4_v2",
        location="westus2",
        min_instances=0,
        max_instances=4,
    )
    ml_client.begin_create_or_update(cluster_cpu)
...
This makes it very intuitive to port your implementation from one method to the other, and to mix the two methods in the same project.
Keeping your ML and cloud files separate
I often recommend that Azure ML users learn the CLI method first because separating the ML-specific files that run locally from the cloud-specific files comes for free — your ML code is in Python files and your Azure ML code is in YAML files! If in the future you decide to switch to a different cloud solution, you can simply replace the YAML files with other files, without changing any of your ML code.
When using the SDK this separation takes a bit more planning, but it’s not hard to achieve. Here’s how I separate the code in the project for this post:
cloud
    common.py
    conda.yml
    delete_endpoint.py
    endpoint.py
    job.py
src
    neural_network.py
    train.py
    utils_train_nn.py
I keep all the files that I need to train my neural network locally in the src directory, and I keep all the code I need to train and deploy on Azure ML in the cloud directory. If in the future I decide to switch cloud providers, I can replace all the files within cloud, and continue using all the files under src.
So, as long as you separate your ML code from your cloud-specific code, the SDK method is as powerful and flexible as the CLI method.
Training and deploying using the Azure ML Studio
Using the Azure ML Studio should be intuitive once you’re familiar with the CLI method. Instead of creating resources by writing a YAML file and executing a command, you create them directly using the UI. The decisions you need to make when creating each resource are basically the same as the ones we specified in the YAML files.
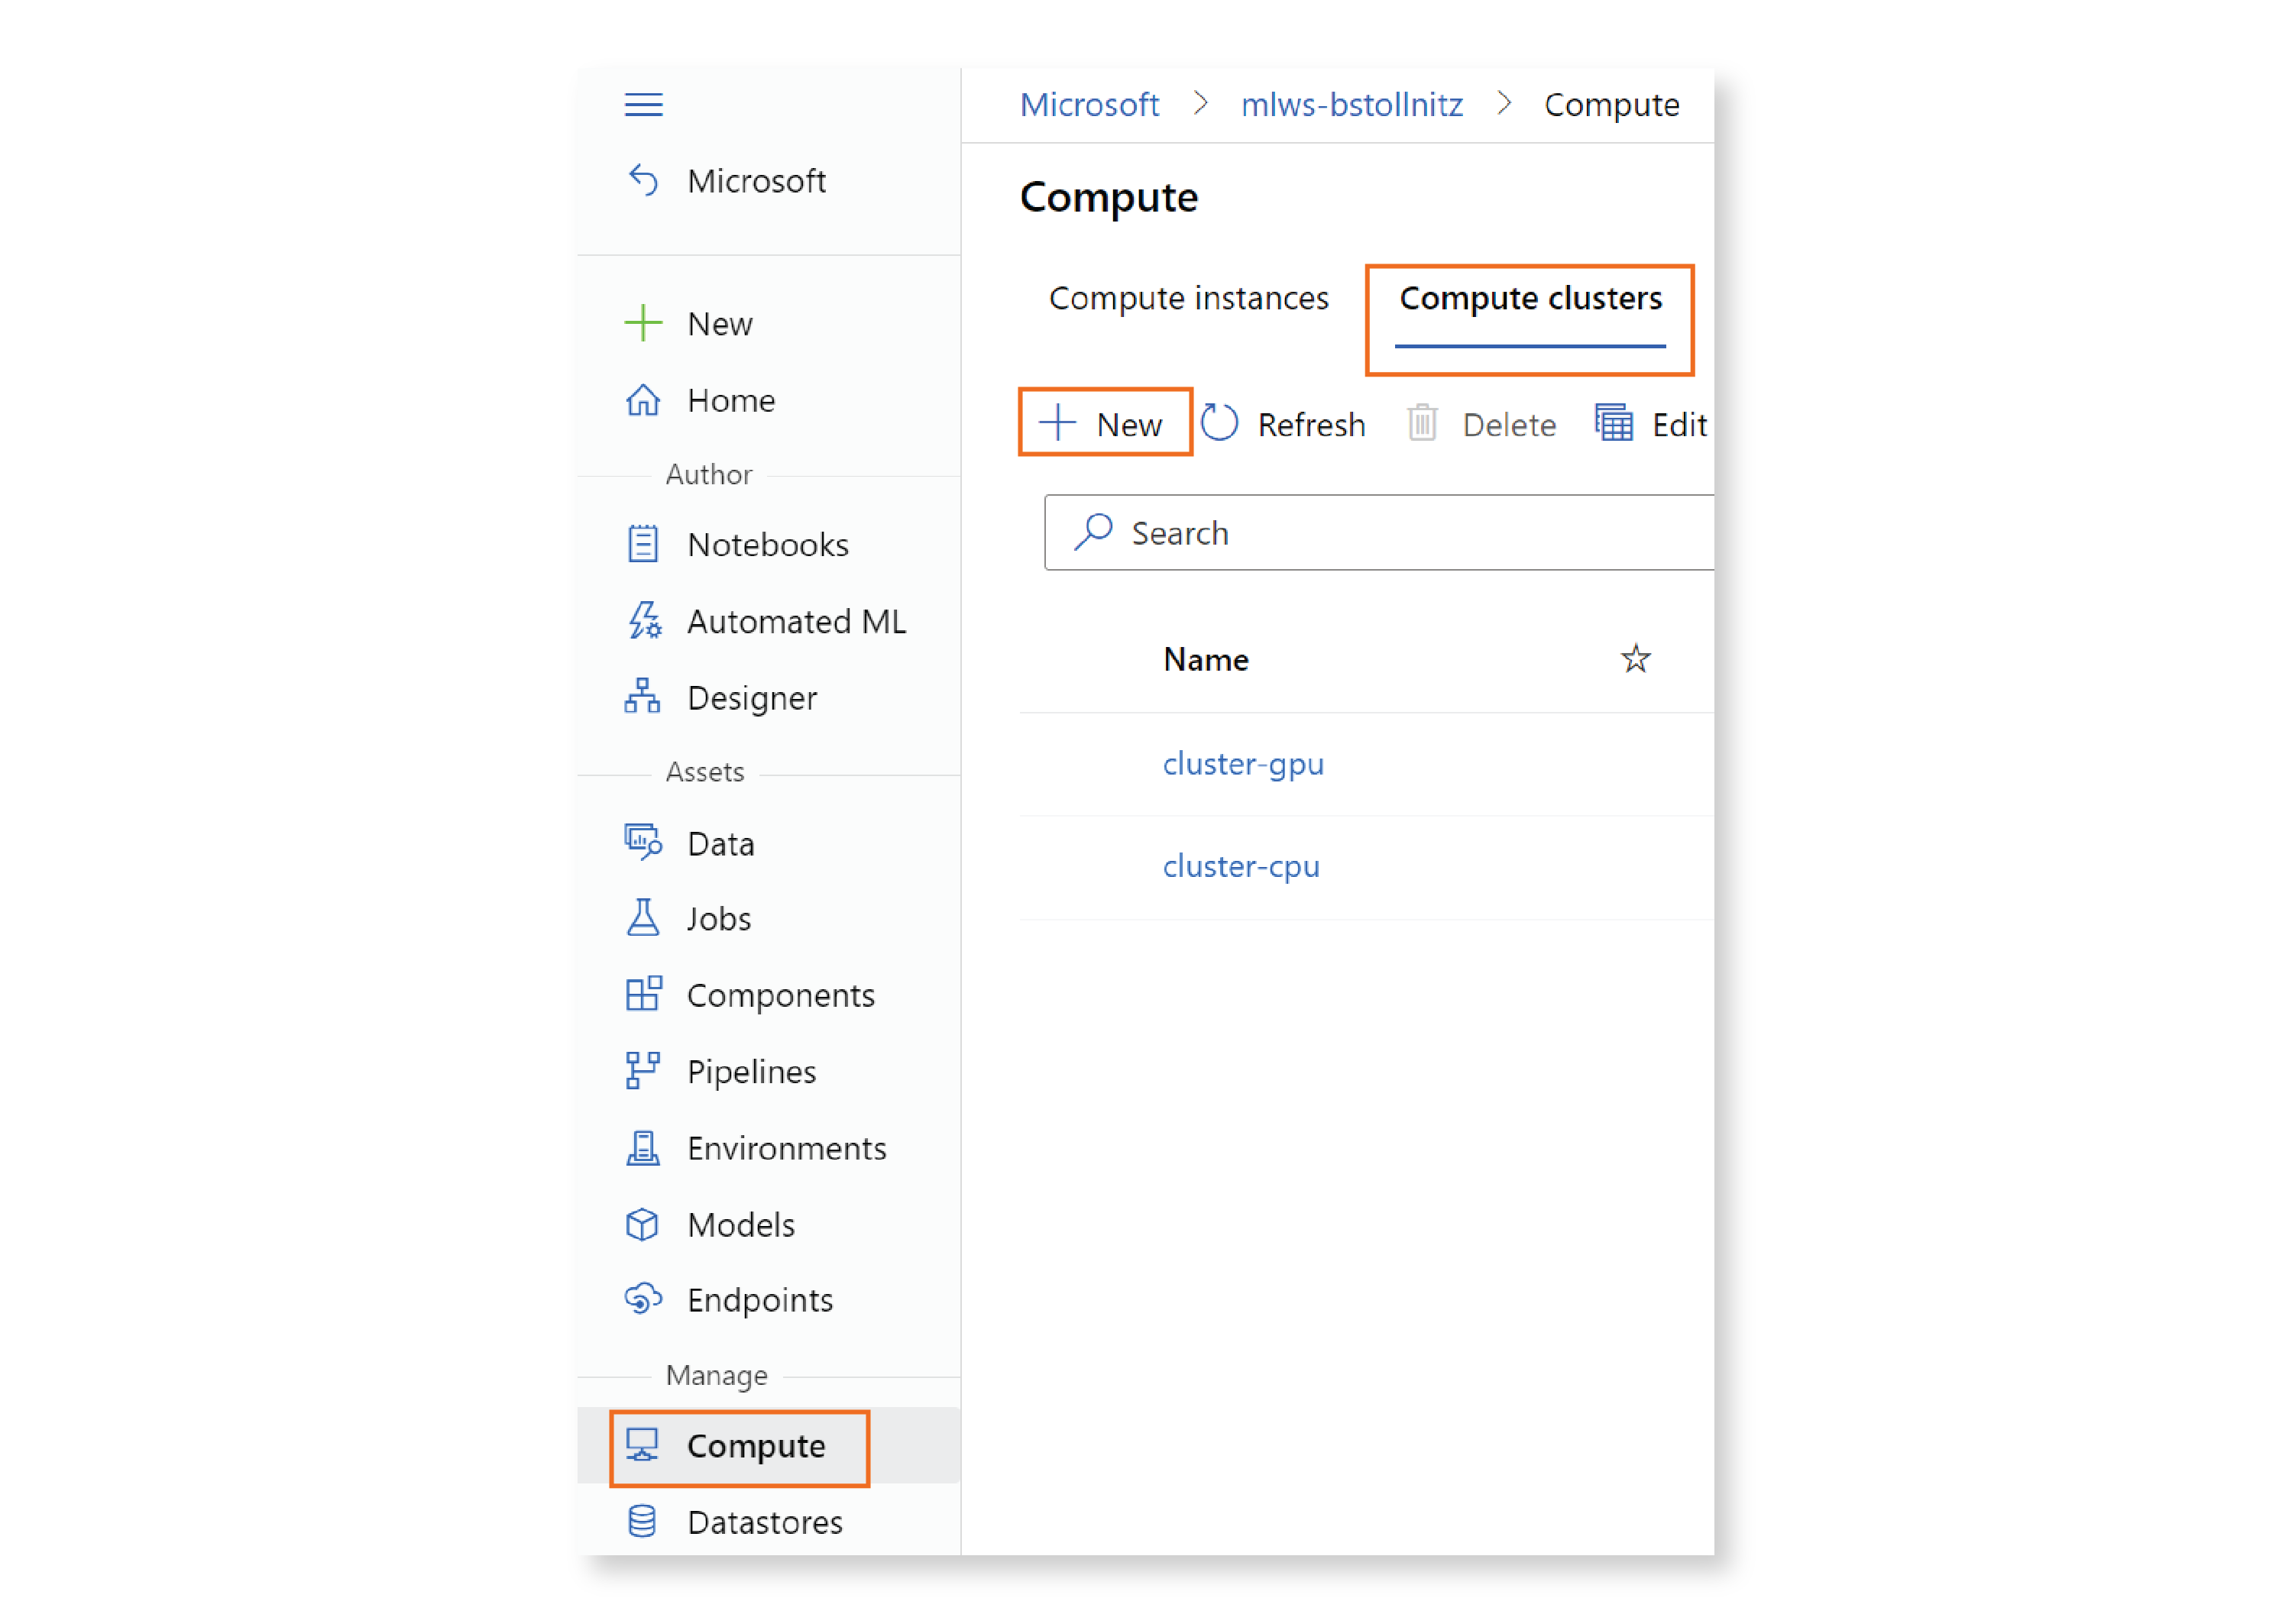
For example, let’s see how you would create the compute cluster. You would click on “Compute” in the left menu, then “Compute clusters” in the top menu, then ”+ New.”
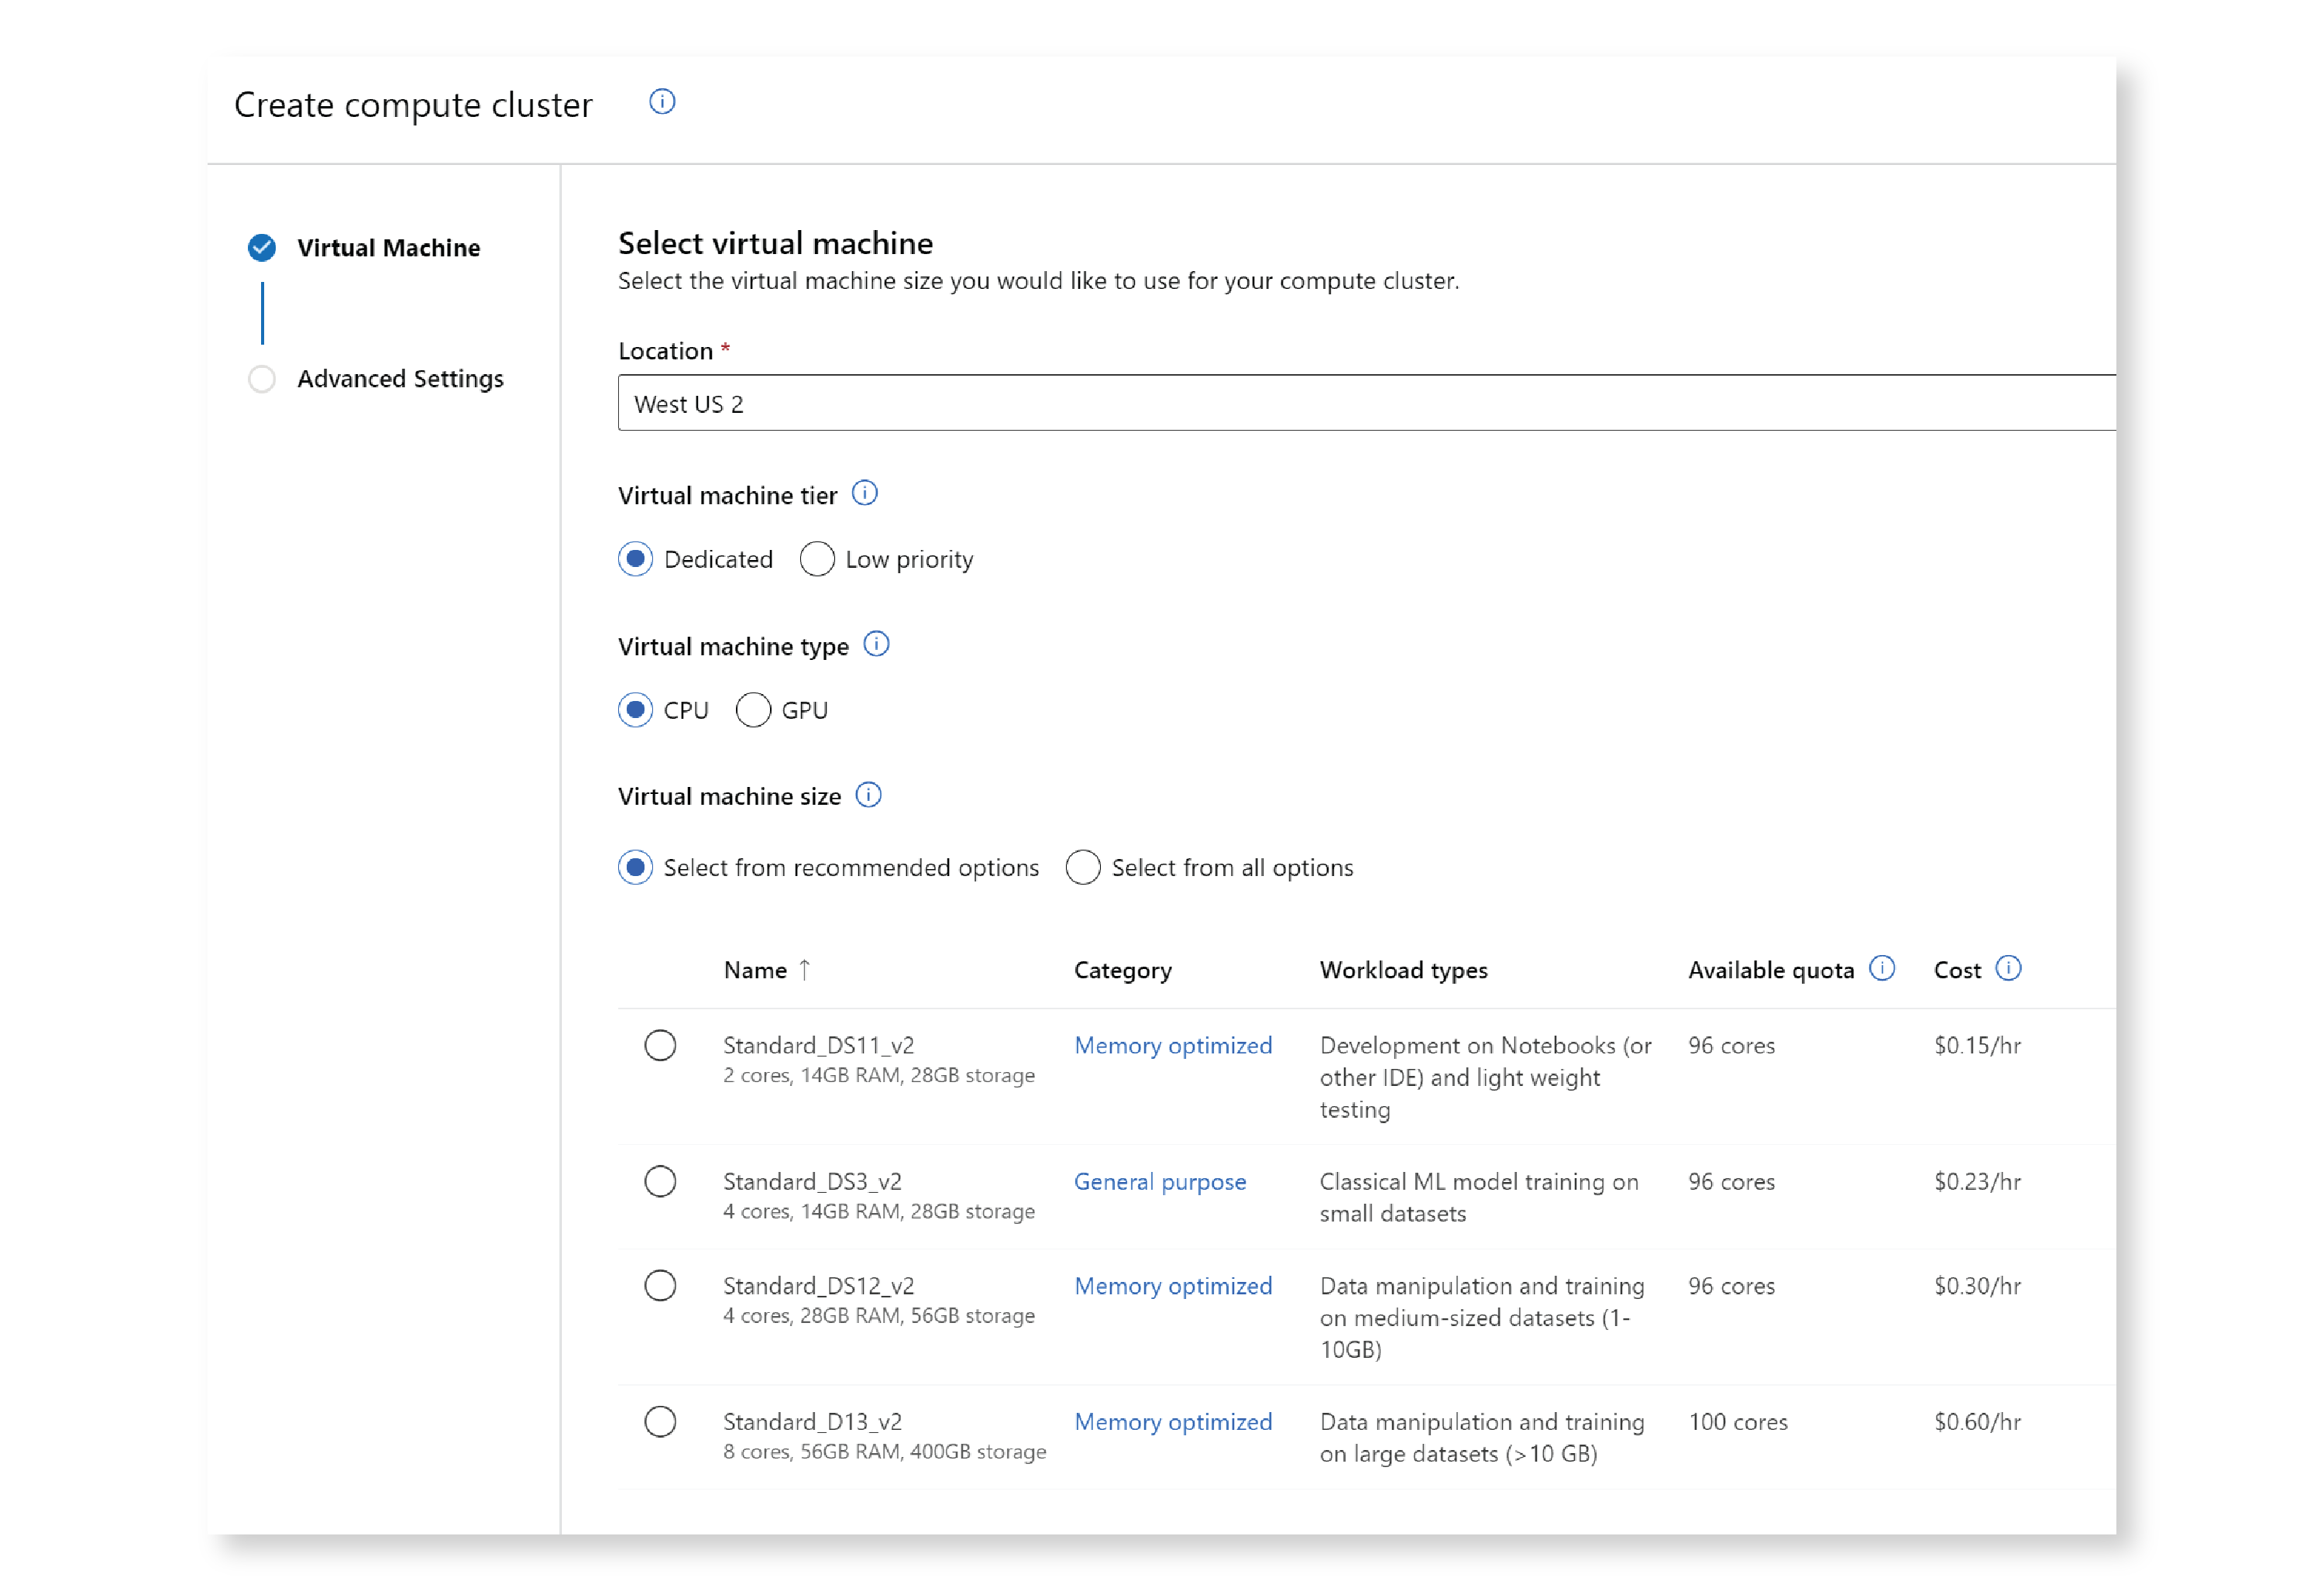
A window opens that allows you to choose the compute location and VM size. One advantage of using the UI to create your compute cluster is that you get a lot of help when choosing the VM size, including information about what each machine is optimized for, how many cores you have available in your subscription, and the cost of using each machine per hour. You can select a recommended machine size, or search all machines.
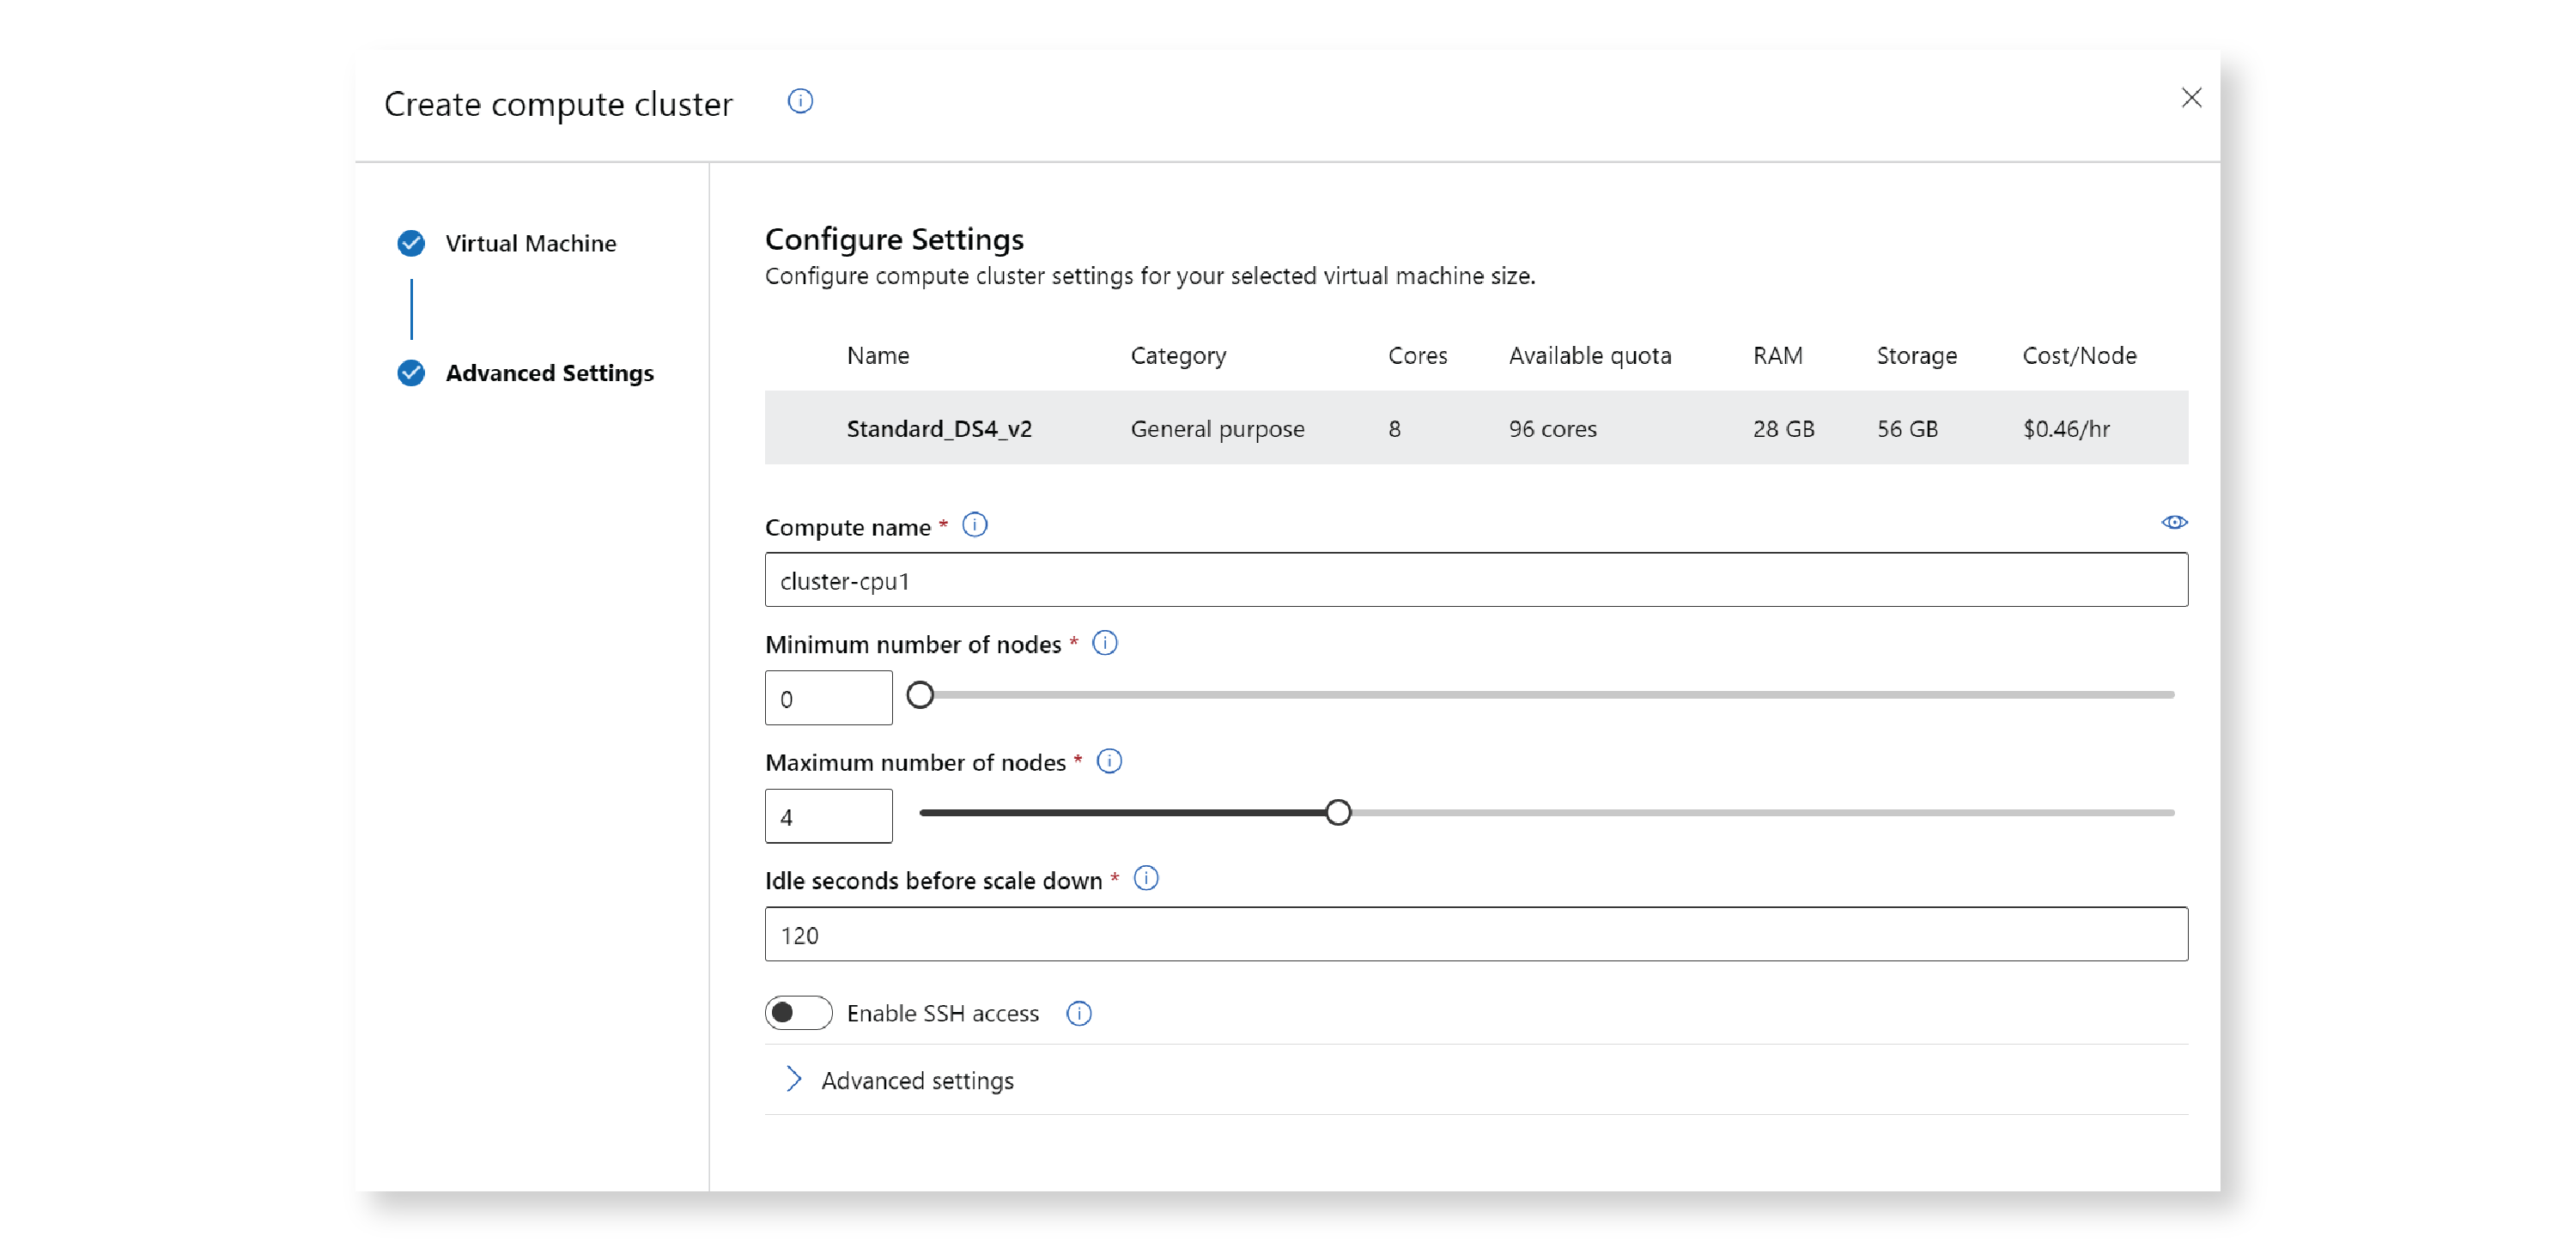
After pressing Next, a new window opens that allows you to choose a compute name, the minimum and maximum number of nodes, and a few other settings.
You can create other types of resources in a similar way.
The Azure ML Studio is a great option to create resources that you’ll only need to create once, because it offers so much guidance. However, resource creation is not as easily repeatable in the Studio as it is with the CLI or SDK, so it’s not as efficient for resources that you plan to re-create often.
Conclusion
In this post, you learned how to train and deploy a model using three methods: the Azure ML CLI, the Azure ML Python SDK, and the Azure ML Studio. Now you’re well prepared to choose the appropriate method for each scenario you’ll encounter in the future.
Read next: How to train using pipelines and components in Azure ML